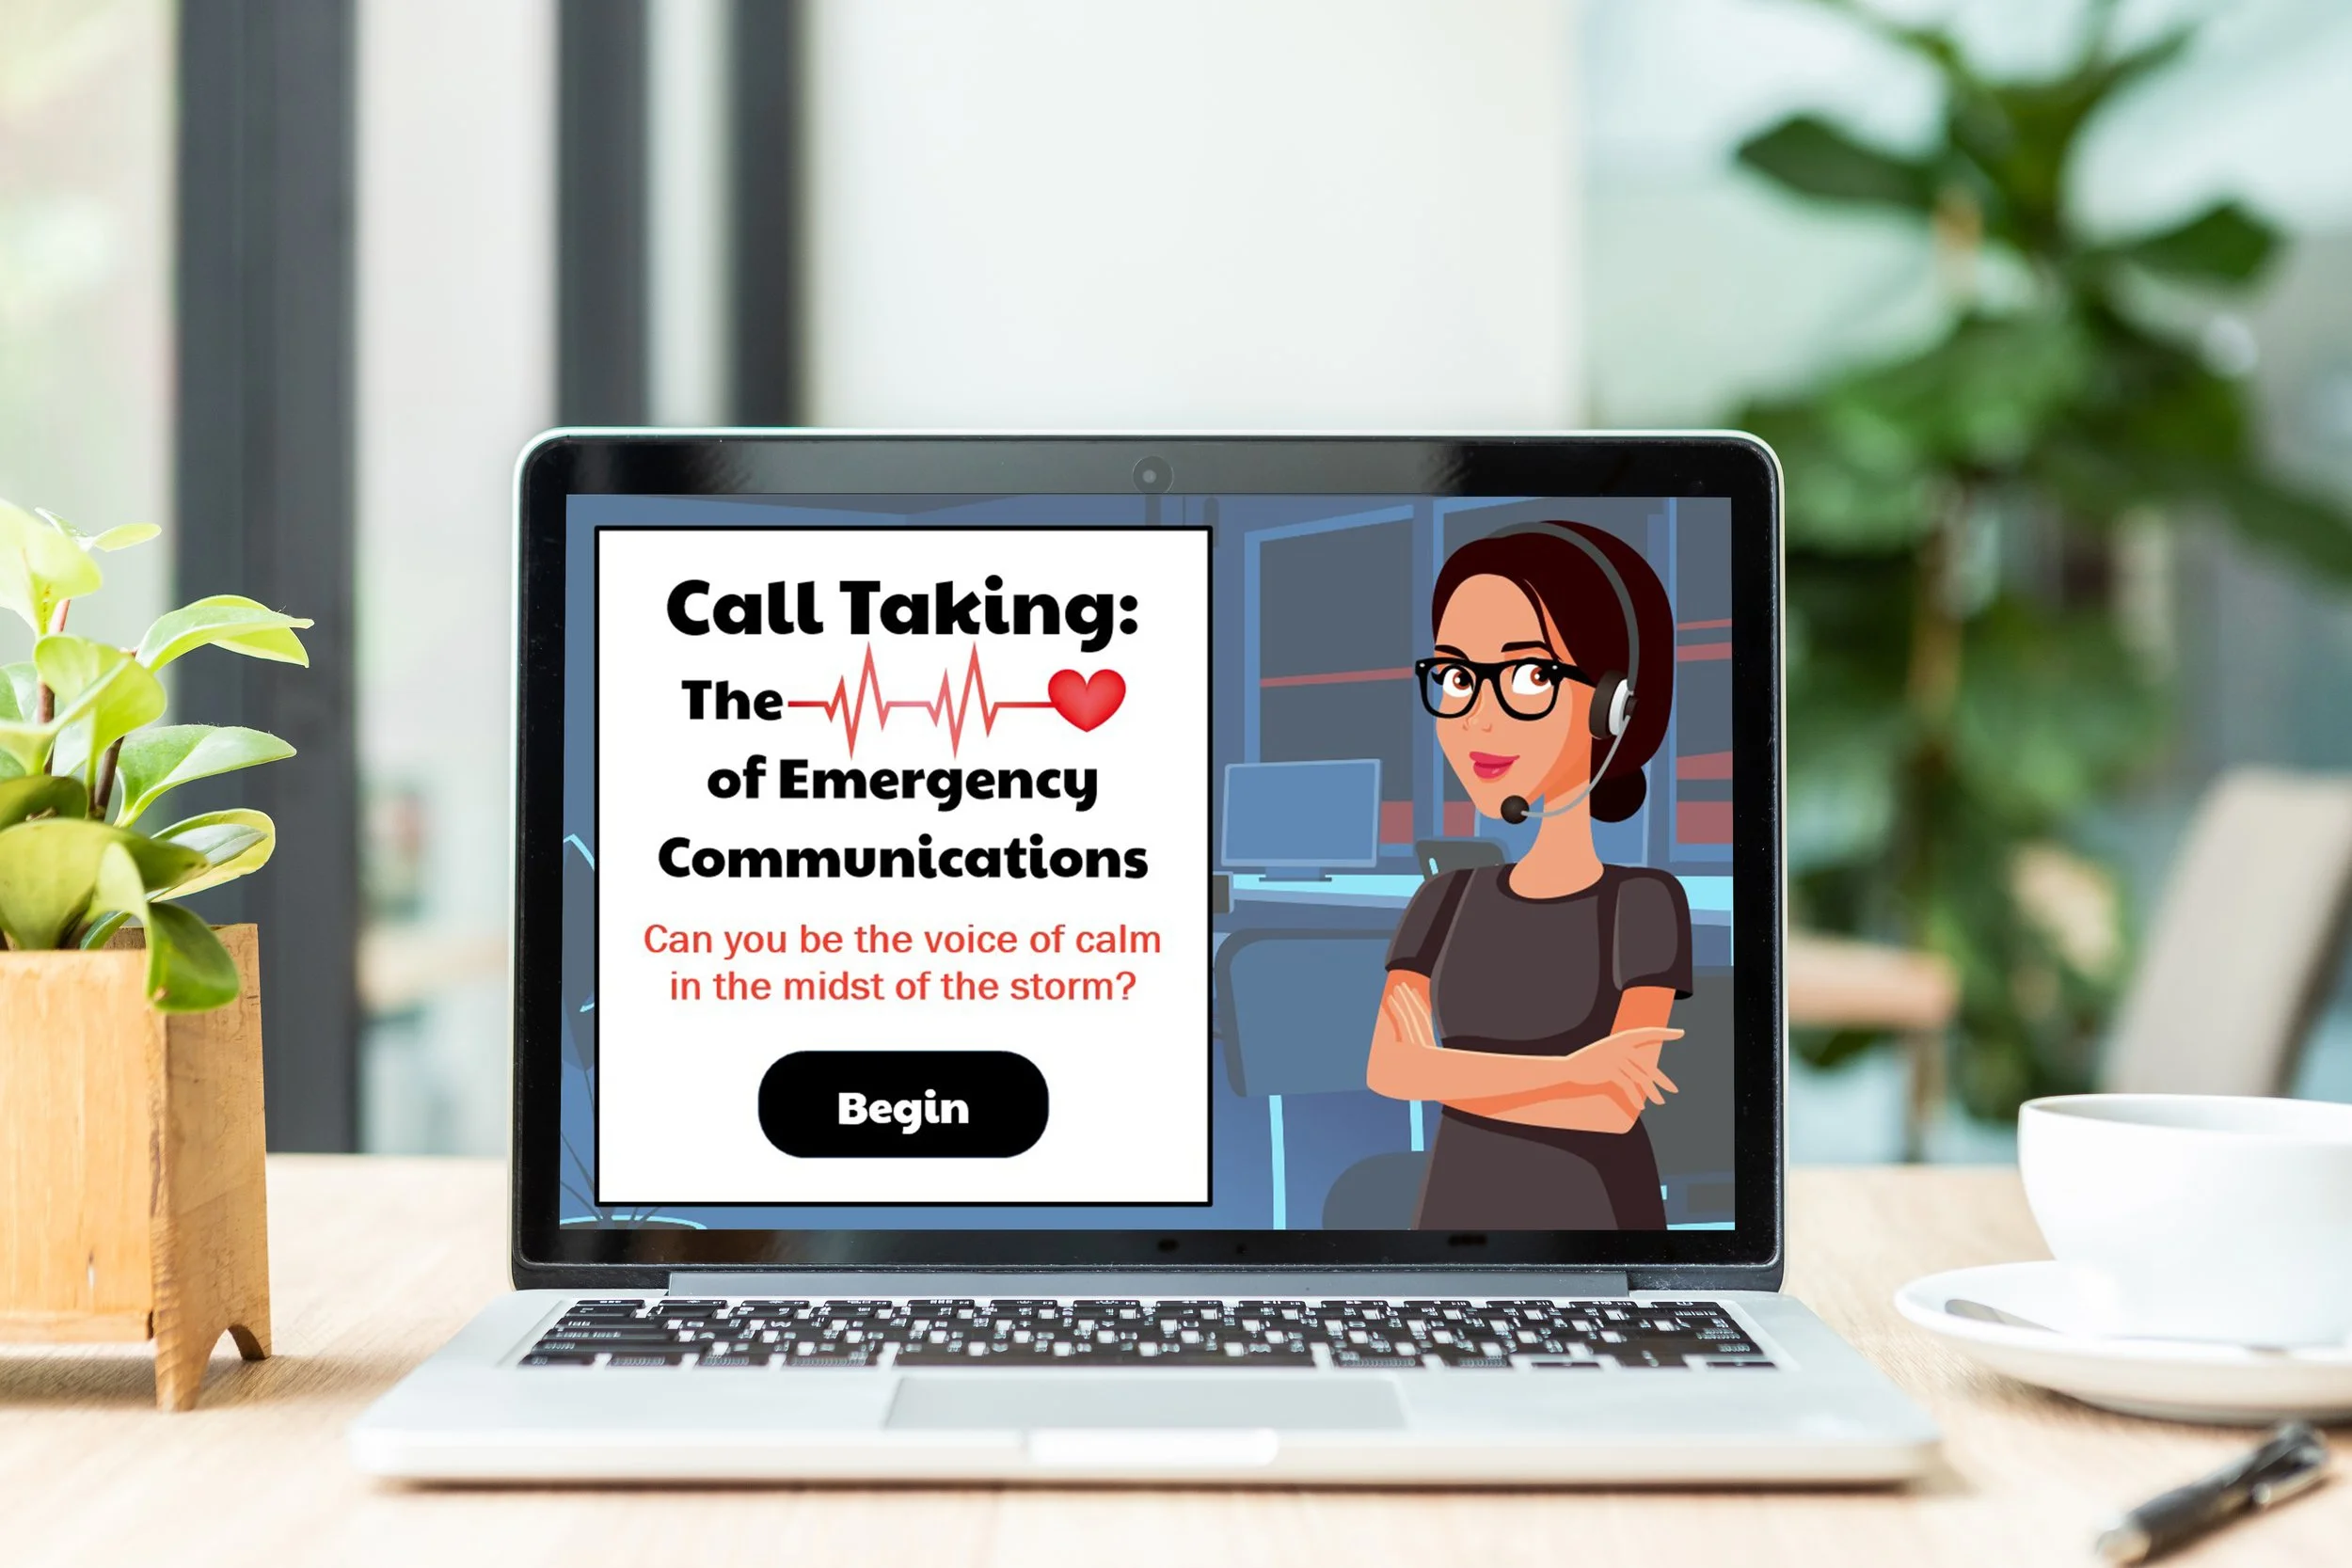
Call Taking: The Heart of Emergency Communications
Scenario-Based eLearning Training
OVERVIEW
This scenario-based eLearning concept project is designed to help emergency call takers new to the profession effectively and efficiently implement the 5 W’s of Emergency Call Taking. If done correctly, the call taker can help prevent further injury, harm, or even death to a person who finds themself in an emergency situation.
Audience: Emergency Call Takers New to the Profession
Responsibilities: Instructional Design, eLearning Development, Storyboard, Action Mapping, Visual Design, and Mockups
Tools Used: Articulate Storyline 360, Adobe XD, Adobe Illustrator, and MindMup
The Problem
I designed this concept project to assist emergency call centers throughout the United States in training new hires to develop into effective and efficient emergency call takers. Those new to the profession were making similar mistakes. These mistakes led to an increase in response time that resulted, at times, in further injury, harm, or even death to the person in need of emergency assistance.
After consulting subject matter experts (SMEs) and researching information about emergency call taking, I identified the most common mistakes new hires tend to make. The following is a list of those potentially deadly mistakes:
Neglecting to determine first where to send help
Overrating or underrating the severity or potential severity of the situation at hand
Assuming whether or not an event is taking place presently
Neglecting to find out who the caller is “in relation” to the call
Asking either too few or too many questions of the caller
The Solution
After defining the problem, I began to analyze it to determine if the cause was a lack of knowledge, skill, or an environmental factor. Upon further investigation, I discovered that many call takers new to the profession need to learn the skill of using their voice, their most effective tool, to treat someone empathetically, ask pertinent questions, and relay life-saving information.
Along with this skill, call takers need to know which questions to ask to send the appropriate help promptly. After determining the problem was primarily due to a lack of skill, I proposed a scenario-based eLearning solution to help improve response time by an average of 3 minutes. Additionally, I created a job aid entitled “The 5 W’s of Emergency Call Taking” so learners would know which questions to ask.
The combination of the solutions helped address the skill and knowledge gaps uncovered while analyzing the problem.
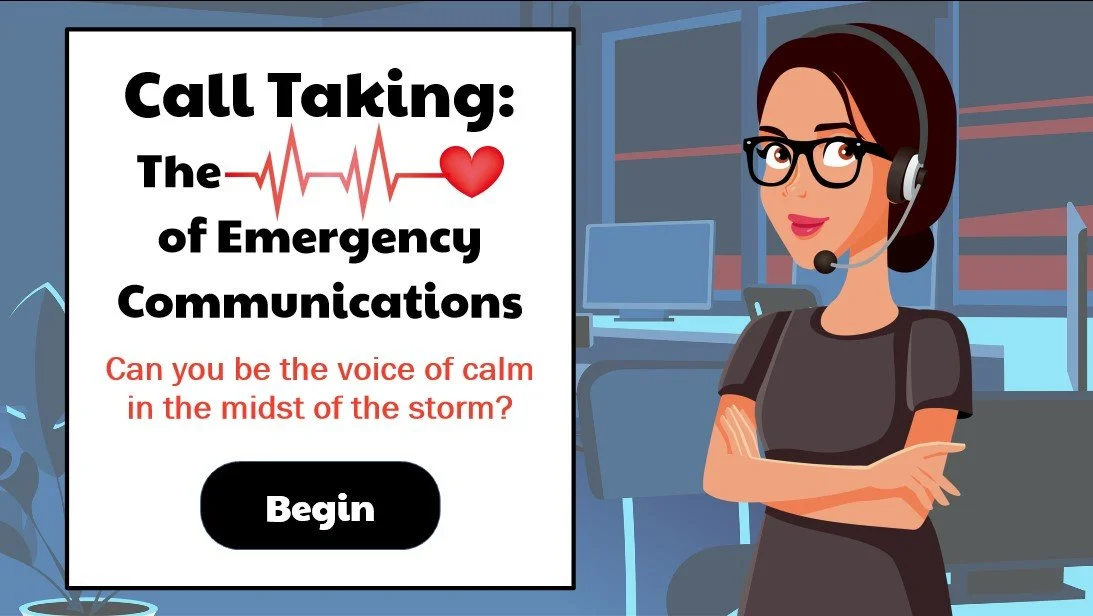
Title Screen
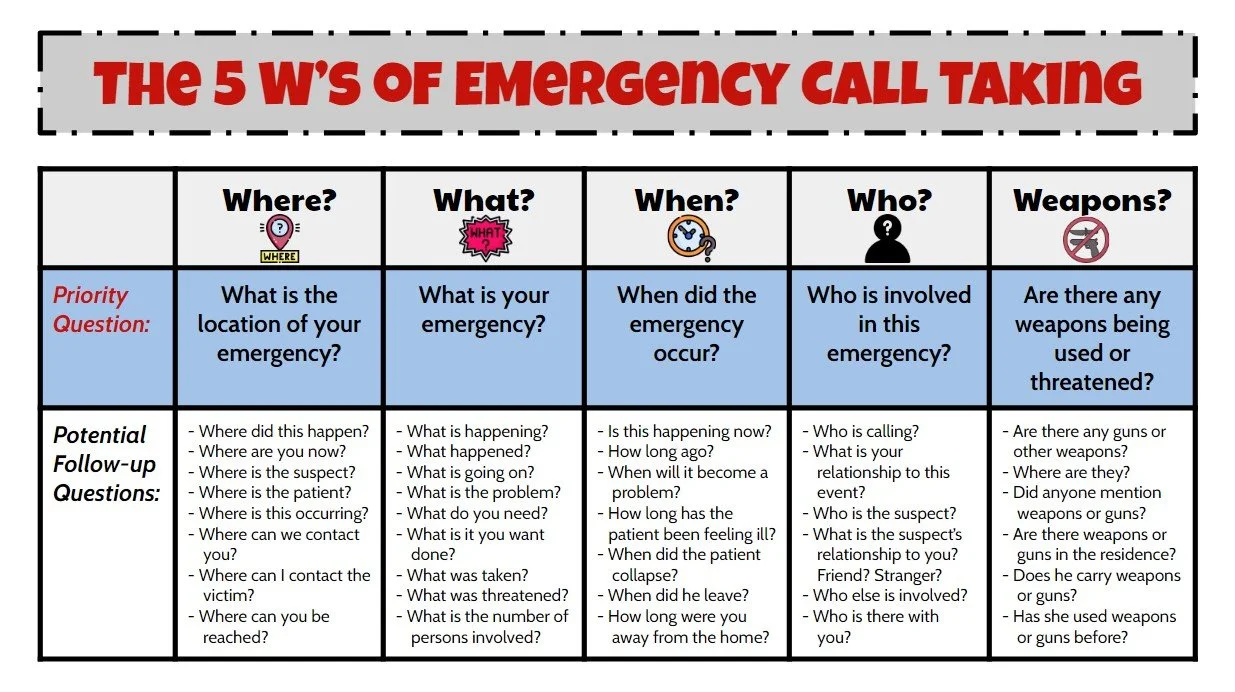
Tip Sheet: The 5 W’s of Emergency Call Taking
MY PROCESS
The creation of this project was an ongoing process. Each step along the way involved deep analysis and continual iteration to ensure a learner-friendly experience that is both engaging and behavior-changing.
I had the pleasure of designing and developing this eLearning experience from start to finish. The first step was to create an action map to help identify what people needed to do differently. From there, I wrote a text-based storyboard, designed visual mockups, developed an interactive prototype, and, with the help of ongoing feedback and user testing, developed the final product that you see here today.
Action Map
As a result of working with the Director of Emergency Communications, who served as my Subject Matter Expert (SME), and conducting research on emergency call taking, I was able to identify common mistakes that emergency call takers new to the profession were making. Now it was time to focus on behavior change. I began to ask the critical question posed in Cathy Moore’s book Map It, “What do they need to do, and why aren’t they doing it?” To help answer this question and ensure this learning experience would offer the opportunity to bring about behavior change, I developed an action map using MindMup.
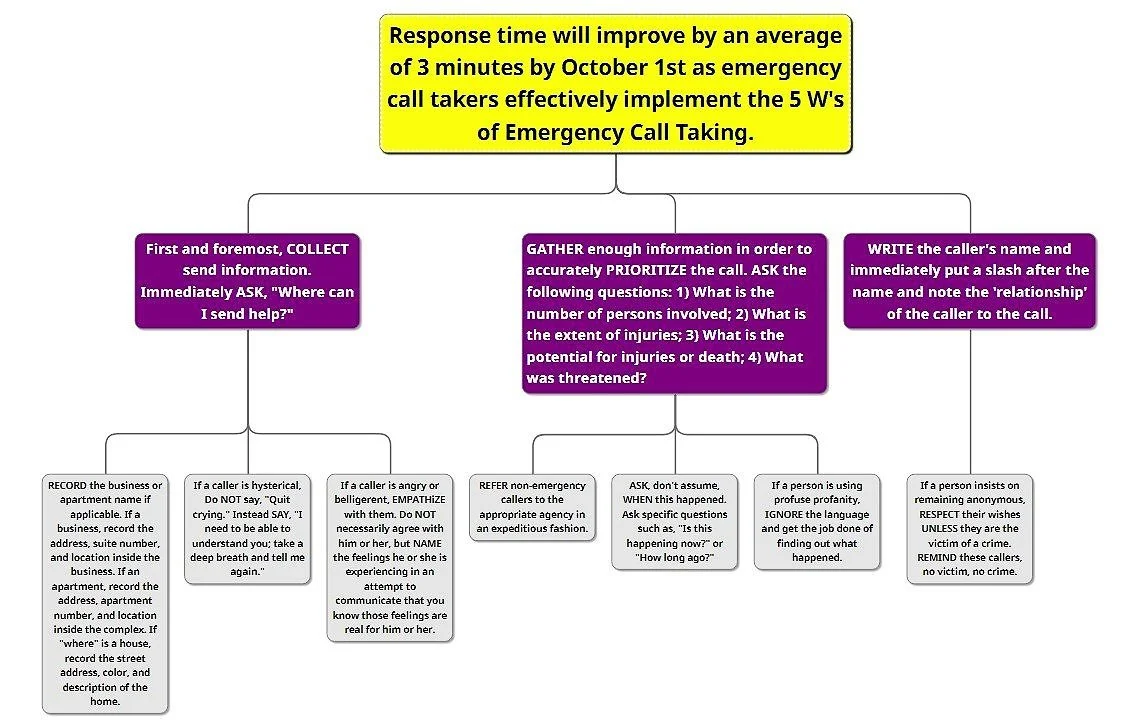
Action Map
The action map helped reveal three high-priority actions critical to emergency call takers sending the appropriate help in time. These three actions became the basis for the entire eLearning experience and helped guide the development of the text-based storyboard.
Text-Based Storyboard
As I sat down to write the text-based storyboard, I aimed to immerse the audience in the scenario-based experience. I wanted the audience to feel the tension an emergency call taker might experience during a high-stress call. The goal was to simulate a real live call and allow the learner to make a behavior change that would result in help arriving in time for the person in need.
To do this, I used my action map as a guide. I created a unique scenario for each of the three high-priority actions. Each situation involves an interaction between the emergency call taker and a mother whose baby needs emergency help. In each scenario, the learner has to choose what they will say next to the caller.
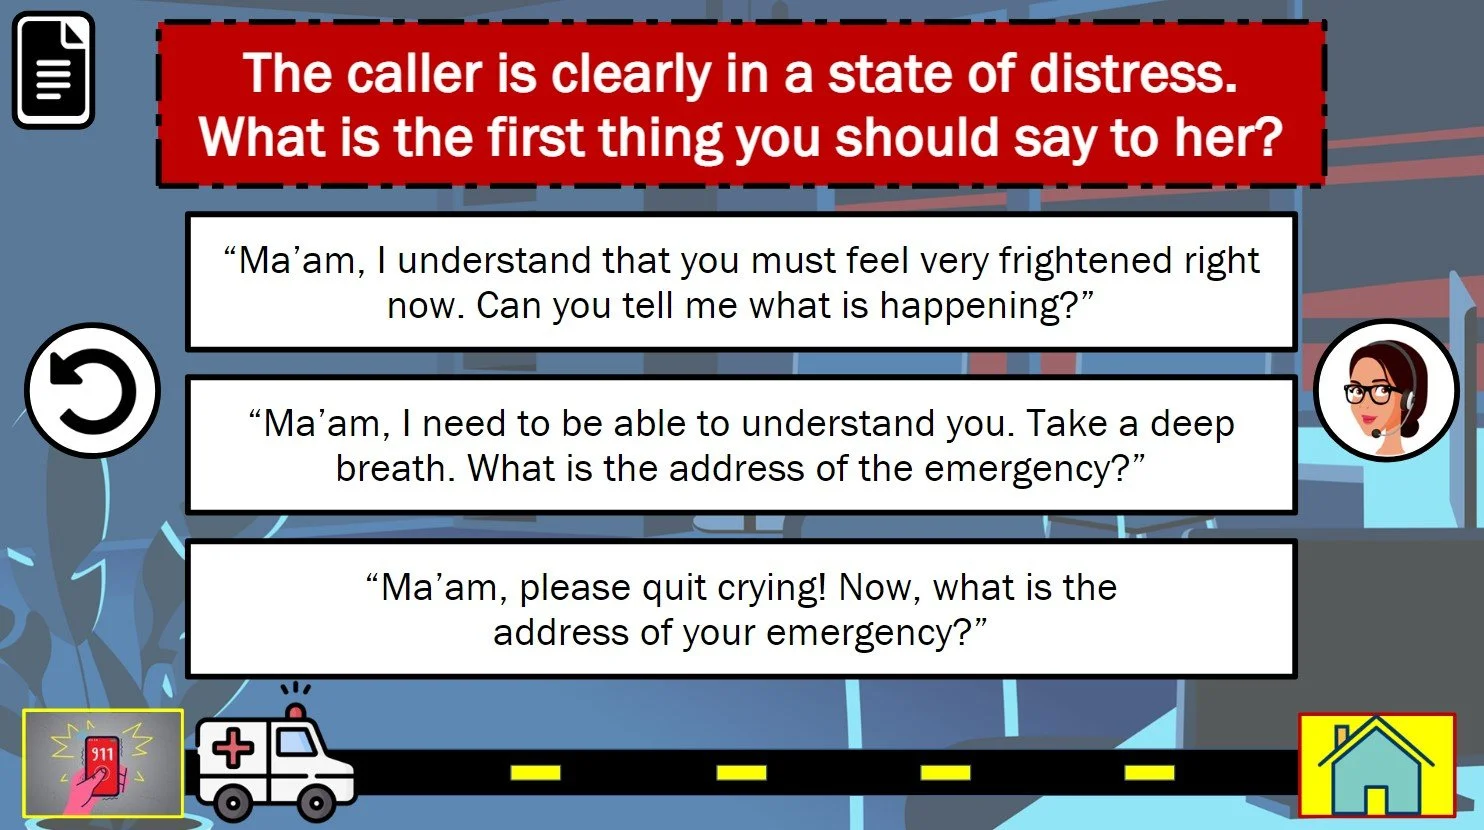
Question 1 Screen
The call taker is presented with a real-world consequence for each incorrect choice they make. Since this is an eLearning experience, the learner experiences those consequences in a risk-free environment. With each correct choice, the learner can see the result of their positive decisions by looking at a meter that features an ambulance moving closer to a house, thus, representing help arriving in time.
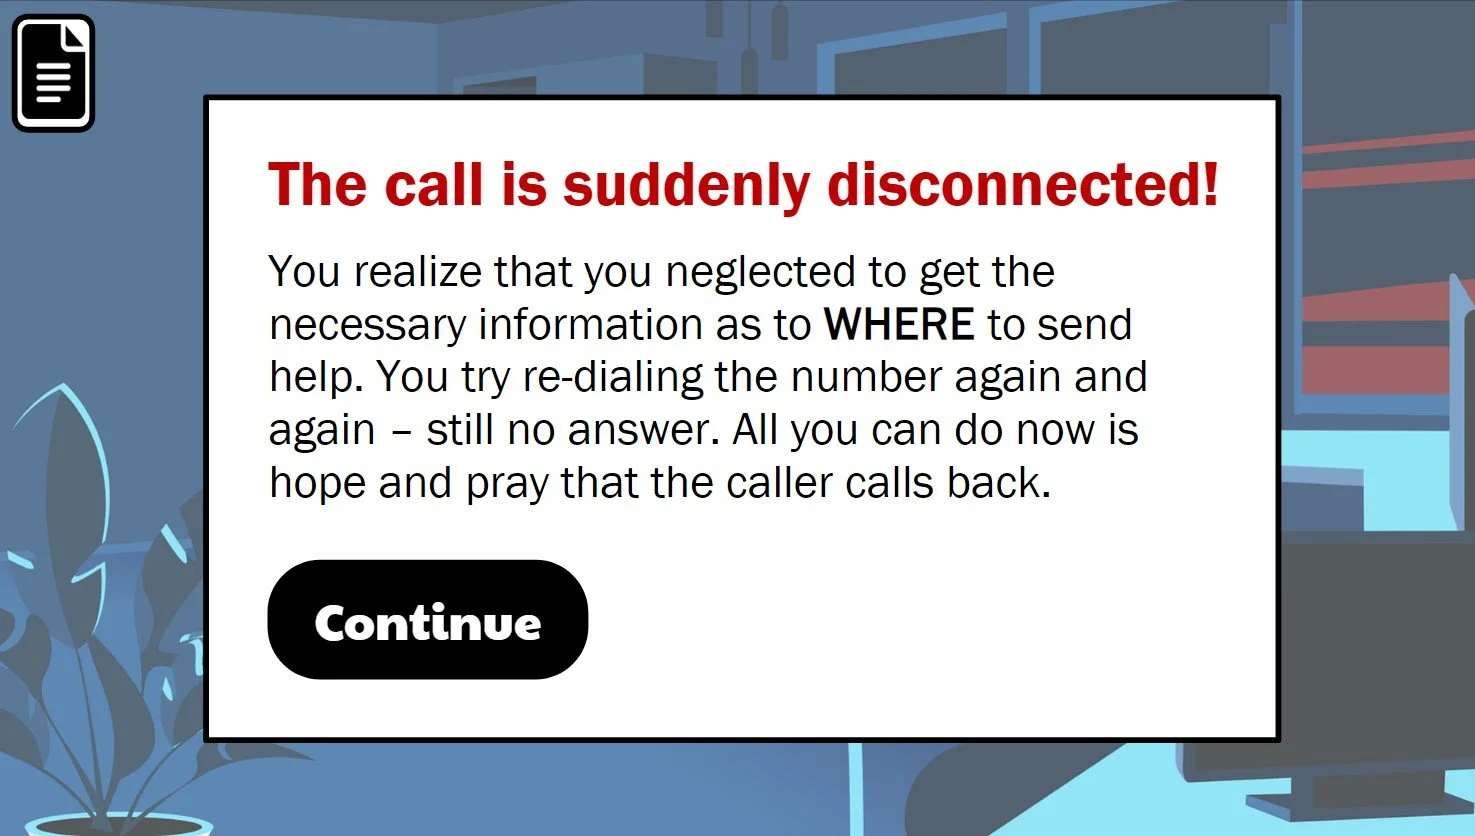
Screen Featuring Real-World Consequence for Incorrect Choice
When creating a scenario-based eLearning experience, choice is a vital component. Not only does the learner have the opportunity to choose what they will next say to the caller, but they also have the choice as to whether or not they would like to access extra help. This extra help is offered in two different forms. One is in the form of a mentor character named Kate, an experienced emergency call taker whom the learner can ask for help when faced with a new decision.
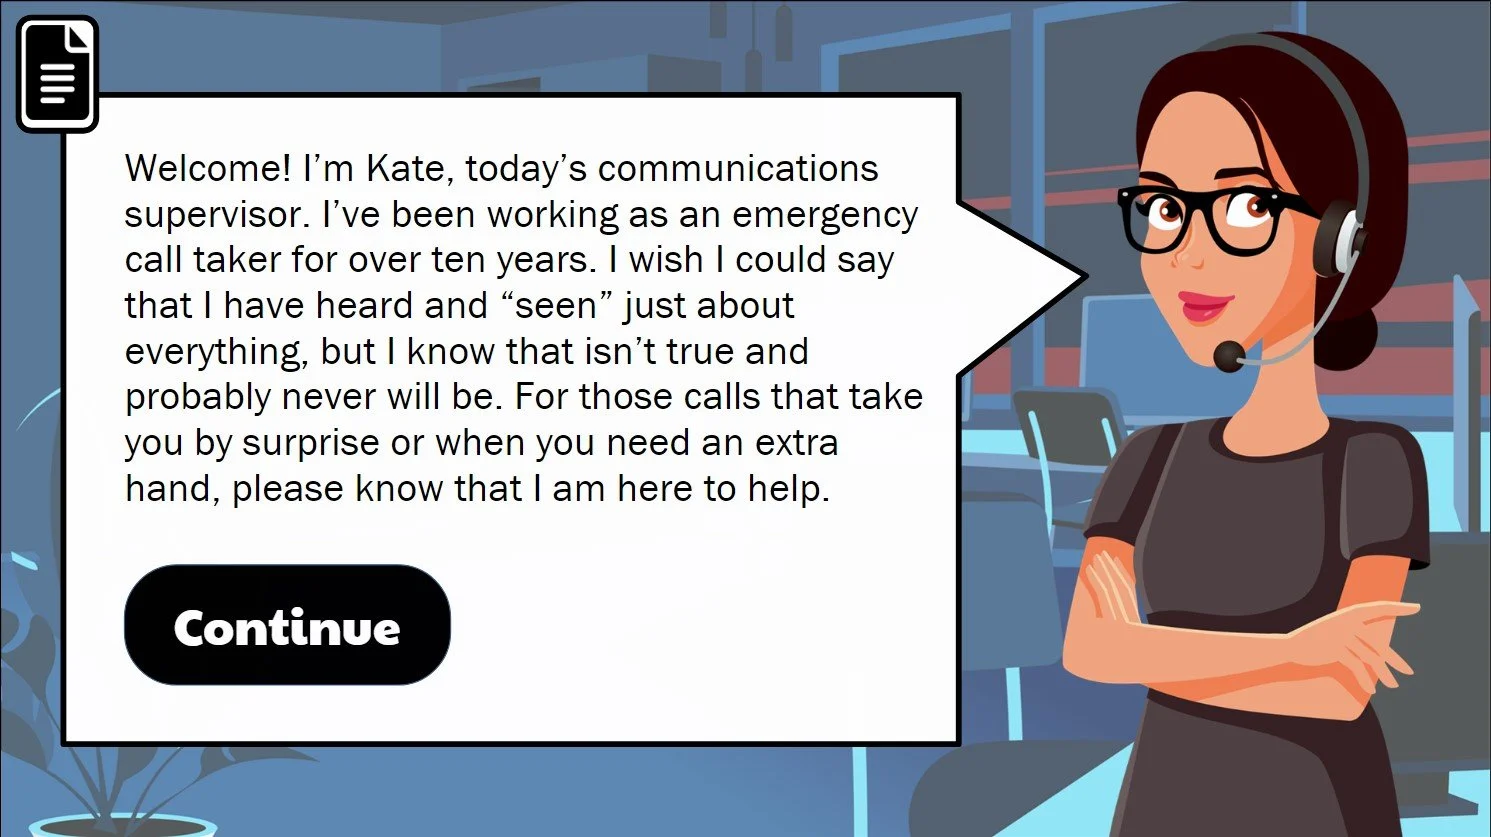
Meet Kate Screen - Mentor Character
The other is in the form of a job aid. At any point throughout the learning experience, the user can access the 5 W’s of Emergency Call Taking tip sheet by clicking on the tip sheet icon. I chose to use the optional mentor character and job aid so learners could CHOOSE what they needed to review rather than forcing upon them information they were already familiar with.
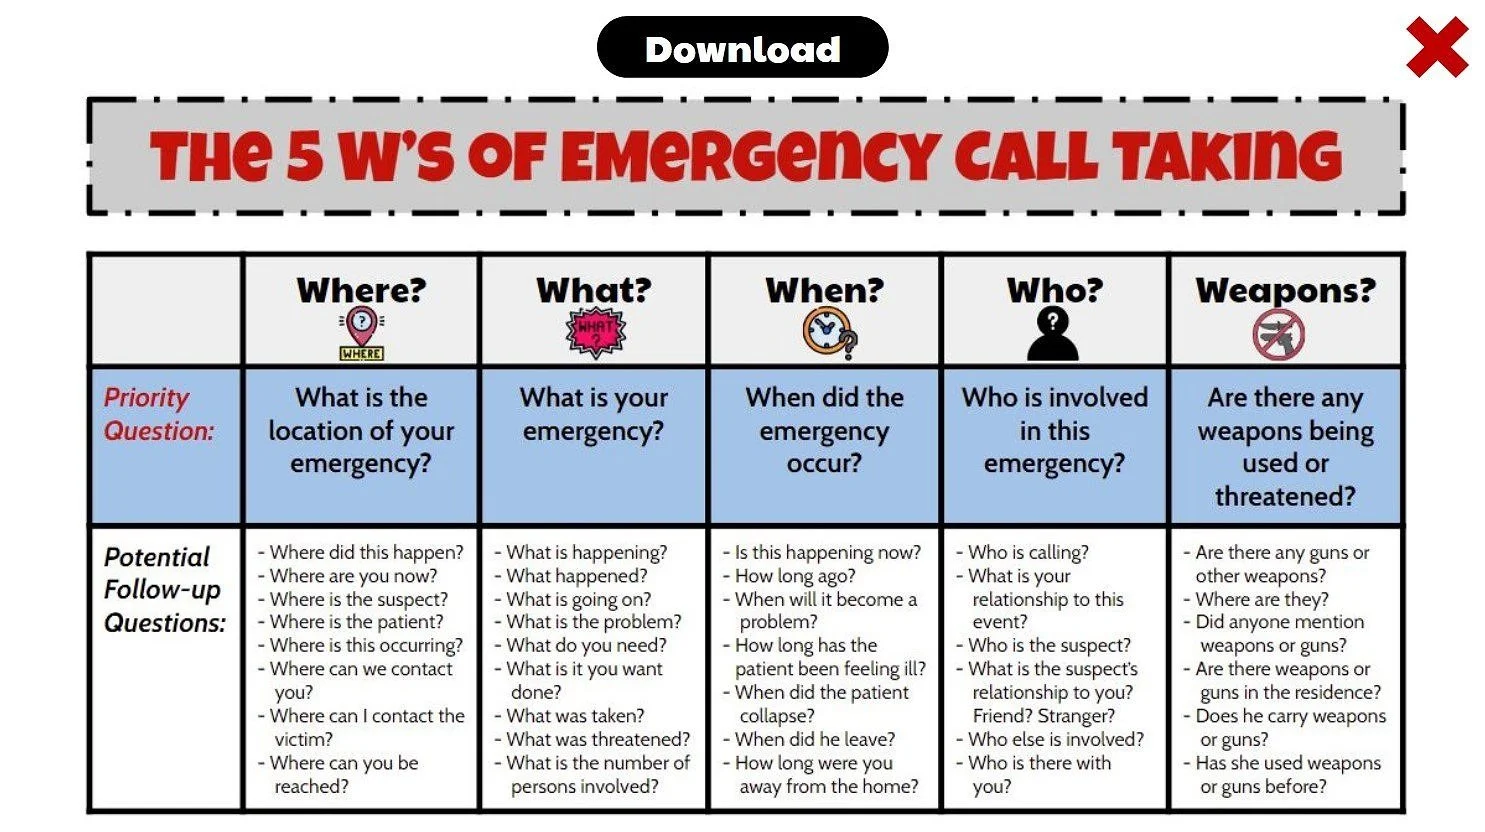
Optional Tip Sheet
The text-based storyboard served as the blueprint for my project. Not only does it contain the script, but it also contains visual, audio, and programming notes. The storyboard enabled me to organize all of my design decisions in one central location, thus, helping me to use my time wisely as I moved on to the development stage of producing the learning experience.
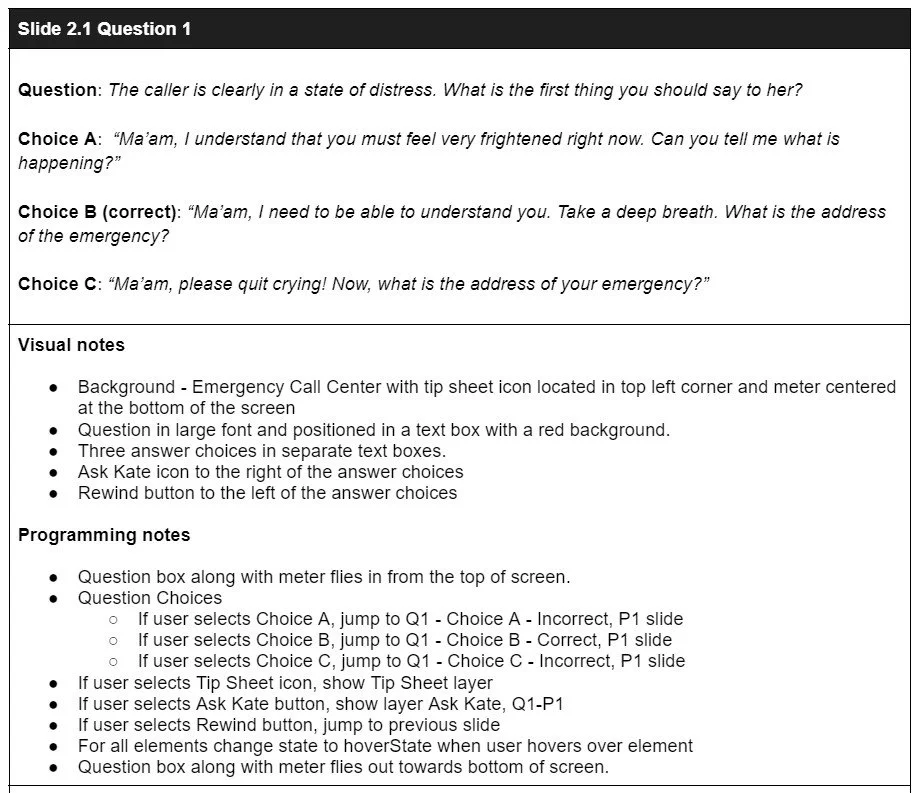


Samples from Text-Based Storyboard
Visual Mockups
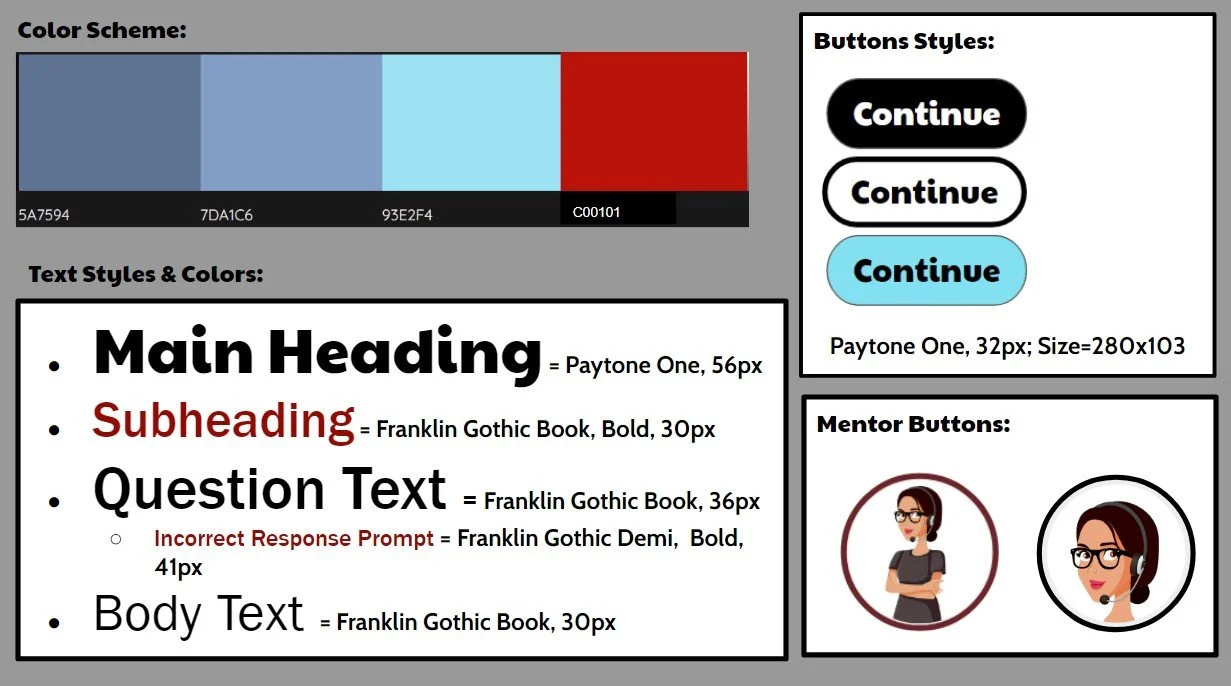
To help ensure consistency throughout the project, I knew it was imperative to make a mood board and style guide before creating the visual mockups. The mood board went through many iterations before I finally landed on the one pictured below. It helped serve as the basis for most of the visual components displayed throughout the project, such as the color scheme, fonts, font sizes, and button style.
Mood Board
I used a combination of tools, Adobe XD, Adobe Illustrator, and Articulate Storyline 360, to create the visual mockups. After sourcing different vector images and backgrounds, I wanted to customize them to reflect the storyline and theme of this project. I then proceeded to manipulate the expressions on the mother’s face to help express the range of emotions she felt as the story progressed, change specific colors in the background images to red to help portray that this was an emergency and solidify the layout for each type of slide. As a result of much feedback and numerous iterations, I was able to make final design decisions that helped ensure each screen was visually appealing.

Mockups of Character
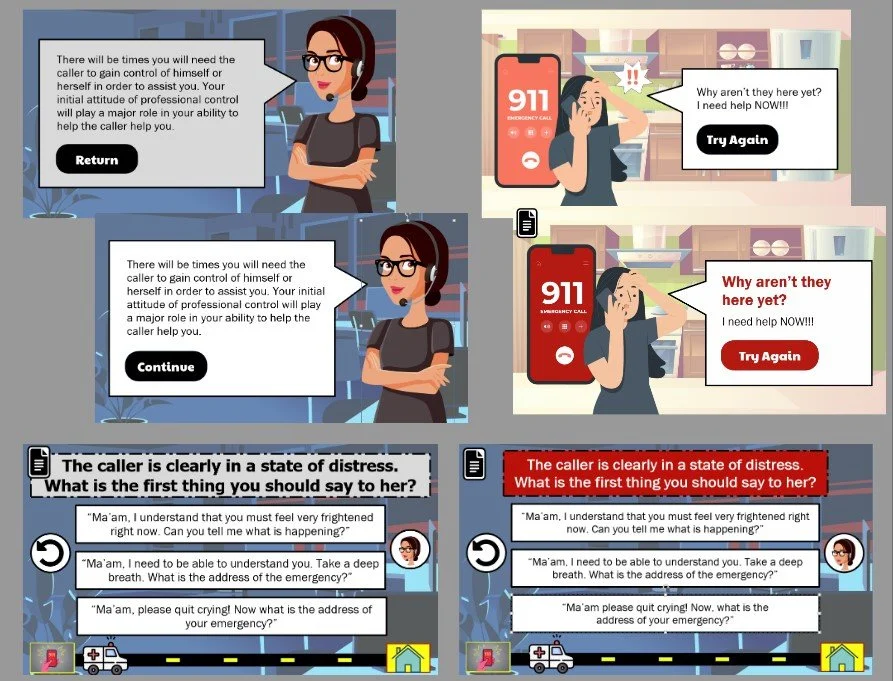
Mockups of Various Screens
Interactive Prototype
Next, I created an interactive prototype using Articulate Storyline 360. The purpose of the prototype was to ensure that the functionality was intuitive to the learner and that the programming of the states, triggers, and variables worked correctly. This prototype consisted of several interactive slides, including the introduction, the first scenario-based question, and all the possible consequences based on the learner’s choice.
After gaining feedback, I decided to make several changes. The first change involved the slide that featured the meter. The feedback influenced me to have the ambulance make its entrance at the beginning of the timeline as opposed to when it was time for it to move. Additionally, to call attention to the fact that the ambulance was progressing toward the home, I added a motion path and the sound of a siren.
Video Featuring Timing of Sound Effects on CAD Screen
The second change I made was adding audio to the title slide and the slides that featured the Computer Aided Dispatch (CAD) system. To make this change, I manipulated the timeline to feature the sounds at the right moment. The timing of elements was vital in bringing about the look and feel of this project.

Timeline Featuring Timing of Audio Elements
The third change entailed adding a fade-to-black transition slide to indicate the transition from the caller’s home to the emergency call center. Initially, I had just included an animation involving the speech bubble fading out because I did not want to have the caller exit the slide since she was remaining in the home. However, it looked funny to have the caller standing in the kitchen once the speech bubble faded. The feedback that I received helped provide a solution. I added the fade-to-black transition to help denote the change in focus to the emergency call center.
Video of Fade-to-Black Transition Denoting Change in Scene
By creating a prototype first, testing it out, gaining feedback, and making iterations based on that feedback, I perfected each slide's visual design and functionality before reproducing each one. This enabled me to efficiently and effectively use the time I had to develop the remainder of the project.
Full Development
Throughout each step of this project, I was challenged to put my Articulate Storyline 360 skills to the test, and I gladly accepted the challenge. In the process, I learned how to problem solve by utilizing what I already knew how to do, being clear on what I wanted to have happen, and then thinking outside the box to explore ways I could accomplish that.
An example is the slide where I draw attention to the mentor button. I was able to use layers and triggers to create the blinking effect.
Video of Blinking Mentor Button
I was also challenged to create variables, manipulate those variables with triggers, and add conditions to the triggers to reflect the consequences of each choice the learner makes, thus, providing a personalized and tailored learning experience for each user. This is evidenced by the branching effect pictured below.
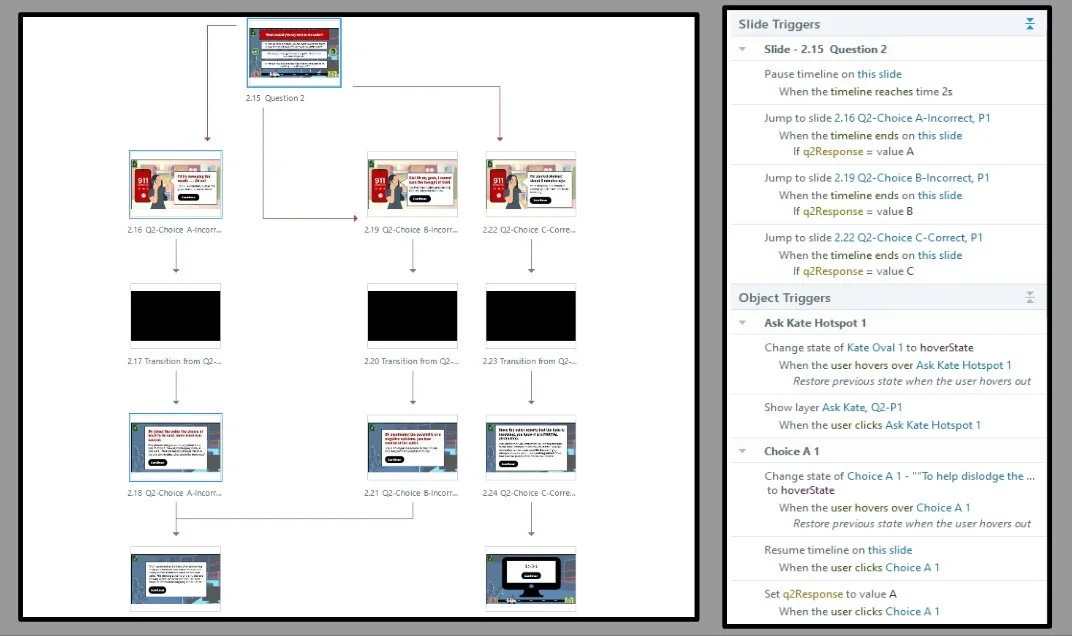
Branching Effect for Question 2
With each new challenge in this project, there was a unique accomplishment. The opportunity to hone my skills and learn new things brought great satisfaction.
RESULTS & TAKEAWAYS
The development of this project helped me gain a greater understanding of the instructional design process from beginning to end. It also offered me the opportunity to sharpen my skills.
The following are some of the things I learned along the way:
How to first identify the problem and determine what type of learning solution would best meet the current need
How essential action mapping is to focus on what the learner needs to DO differently
How to create a text-based storyboard that integrates learner CHOICE throughout
How to create visual mockups that incorporate critical components of visual design while still keeping with the theme of the project
How spacing, font style and size, color choice, button style, the timing of elements, and smooth and consistent animations all contribute to the look and feel of the final product
How critical attention to detail is in creating a polished, professional, and learner-friendly experience
This project provided me with the opportunity to learn new programs and utilize new tools. With the essential tools in my toolbelt, I’m confident I can use them to create and design more eLearning experiences that are behavior-changing and engaging. I have grown significantly as an instructional designer and eLearning developer. Just as importantly, I had fun pushing myself creatively and stretching myself technically to think in new ways, thus, allowing me the opportunity to create the high-quality eLearning project you see before you today.

Let’s Connect:
